Guest Post by Helen Garfield
Are you overwhelmed by a cluttered Canva account?
If so, you’re likely wasting precious time that could be spent doing other more important tasks in your business – especially if you have to create loads of Pinterest pins for clients.
Scrolling through Canva trying to find a certain design eats into your creation time more than you realize. However, if you get your Canva account organized, you’ll be able to work much faster and get more done in the same amount of time.
In this guide, I’ll walk you through five easy tips to keep your Canva account neat and ready to churn out beautiful Pinterest pins for clients without the hassle.
1. Name Your Designs
The quickest way to create chaos in your Canva account is by not naming your designs properly. It may seem like a minor detail when you’re working quickly, but consistent naming helps to find them again quickly.
Why it matters:
Faster search: You’ll be able to easily find specific designs by searching either from the homepage or directly within the editor.
Reuse & update designs: Need to update a Pinterest pin for a seasonal promo? Naming your designs properly lets you find them quickly and avoid starting from scratch.
Pro Tip:
Use a naming convention that makes sense for your workflow. For example:
If you’re working on Pinterest pins for a travel client, name the design something like: “Client Name – Travel Pins – April.”
Or, you could use broader categories, like: “Summer Sale – Business Name.”
2. Keep Canva Design Links Handy
While Canva’s search functionality is helpful, don’t try and rely on it if you’re juggling multiple clients and projects.
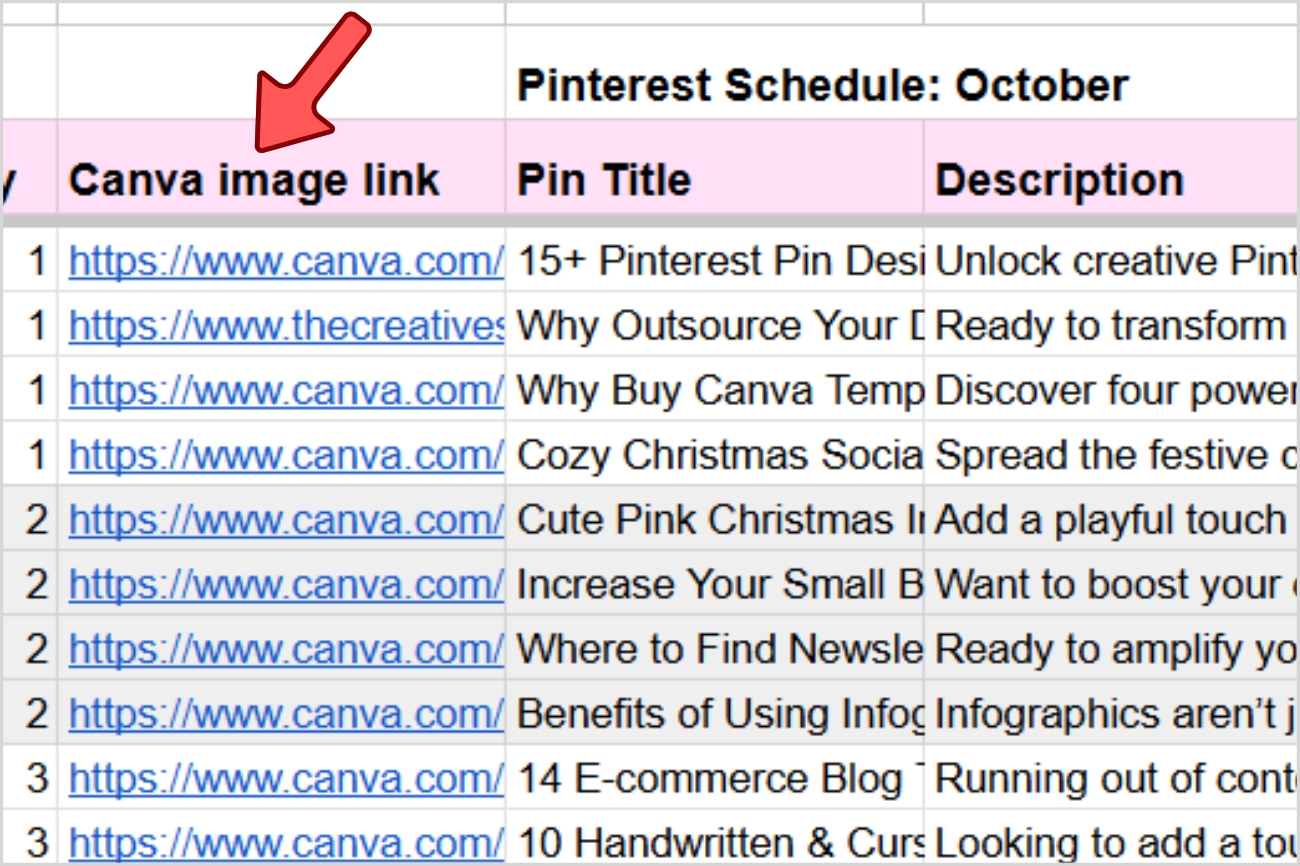
Instead, use a spreadsheet to save the Canva design links for each pin. If you already have a sheet with all the pins, URLs, and descriptions for scheduling, just add another column for the Canva design links. So when it’s time for fresh pins, you can go straight there and swap out images and colors right away.

Steps:
Use a tool like Google Sheets or Notion to create a pin URL and design tracker. Add columns for the project name, client, design type, and – of course – the Canva design link.
When it’s time to create fresh pins, you can go straight to the saved design links in your tracker. This makes it super easy to swap out images, update text, or adjust colors without wasting time searching through Canva.
Pro Tip:
Organize the tracker by month or seasonal campaigns so you know exactly which designs to update for future Pinterest pin batches.
Do you want a client content tracker that’s already created (that tracks pin titles, links, descriptions, and more)? Check out Kathryn’s Pinterest manager templates here!
3. Create Client Folders
If your Canva account is filled with disorganized designs and assets, creating a folder system will save your sanity. Folders and subfolders help categorize your designs so you can find what you need when you need it.
Steps:
Organize your designs based on your mental structure: by client, project, or asset type (e.g., templates, logos, social media posts).
If you design across multiple platforms (like Pinterest, Instagram, and Facebook), create folders for each platform to avoid confusion.
Pro Tip:
For Pinterest pin creation, create folders for each client with subfolders for different types of pins: standard pins, video pins, story pins, and so on.
4. Clear Up Uploads
Your Uploads tab can quickly become a mess if you’re not careful. Avoid keeping every file in the upload section – this is especially true if you’ve got a Canva Pro account where assets can be stored more strategically.
Steps:
Move uploads into folders as soon as possible. Keep them organized by relevance – store brand graphics in one folder, and stock photos in another.
Bulk move files to speed up organization. You can select multiple files and assign them to the appropriate folder in just a few clicks.
Pro Tip:
As you gather client-specific assets for Pinterest pin creation, immediately file them in a relevant folder, making it easy to grab them for future designs.
5. Set Up Brand Kits
If you have Canva Pro, the Brand Kit feature is a game changer. Having all of the brand assets – colors, fonts, logos – accessible in one place speeds up the process of creating consistent designs for your clients.
Steps:
Go to your homepage, click Brand Hub, and start adding assets like logos, fonts, and brand colors for each client.
Canva can create a color palette from any image, but you can also input specific hex codes to match the client’s branding.
Pro Tip:
For clients with multiple brands or sub-brands, create separate Brand Kits for each, ensuring you have quick access to the correct assets when designing Pinterest pins.
Want to create effective branded Pinterest pins for your clients? Read this post!
6. Star Your Favorite Elements
When creating Pinterest pins, you often rely on a core set of elements, like favorite fonts, icons, or shapes. Instead of searching for them every time, use the star feature to mark elements that you consistently use.
Steps:
While in the Canva editor, click on any element, head to the information (i) icon, and click star to save it as a favorite.
You can easily access your starred items from the “Starred” tab in the editor, so they’re always just a click away.
Pro Tip:
You could also create inspiration folders for each client where you store their Pinterest templates and design elements ready for when you need them.
Ready to Streamline Your Pin Creation Process?
Now that you’ve learned how to stay organized in Canva and boost your efficiency, it’s time to put these tips into action!
If you’re looking to take your Pinterest pin designs to the next level, I’ve got just the thing for you. Explore my curated collection of Canva Pinterest templates, designed specifically for small brands, service providers, and bloggers.
Fully customizable, these Canva templates allow you to quickly swap out images, adjust colors, and tweak text to fit the brand’s style – all while saving you valuable time!
GUEST Author: Helen Garfield
Helen Garfield is the founder of The Creatives Desk. She has worked in social media and digital marketing since 2010. Helen channels her passion for design and creativity to develop marketing templates and digital products that help small business owners create compelling content to drive growth in their online presence.


